Normally I really hate doing how-to posts because it makes me feel like a little bit of a douchebag, but since several people asked, I’ll show you my process for a tail makeover.
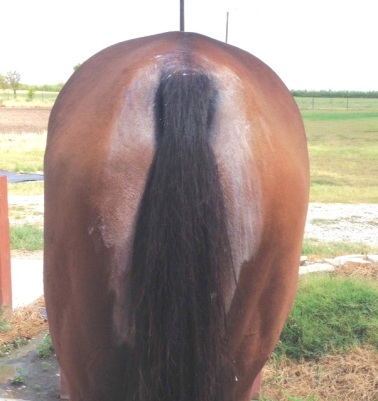
Henry’s tail started out sunbleached, almost touching the ground, and pretty unkempt:
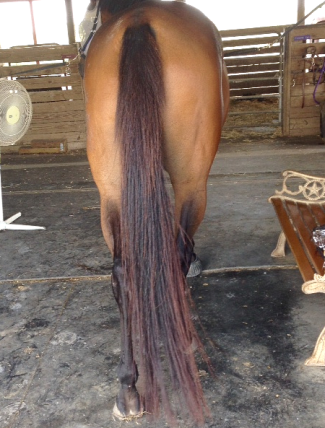
If he was a hunter I would have dyed it and left it alone. If he was a jumper I would have dyed it and banged it a few inches. Since he’s an eventer I dyed it, banged it about 6″, and trimmed the top.
What you’ll need:
- scissors and/or clippers
- hair dye (see more about that below)
- a plastic grocery bag
- vet wrap
- clothes you don’t mind getting trashed
I started off by trimming the top of his tail. There are a lot of ways to do this, my method of choice just being one of many, but it’s the one I’m most comfortable with and it works for me. A lot of people swear that pulling a tail is the only way to go – I’m not one of them. I will never pull a horse’s tail. So that leaves either the scissor method or the clipper method. I feel like I have a little more control with clippers, so that’s what I use. How far down the tail you go is up to you – some go quite a ways down the tail bone, but I personally just go the point of the rump, which ends up being about 6 inches. I pretty much do exactly what’s shown in the video linked above, making sure to go slow and be very deliberate about what I’m shaving off. Remember – you’re only trimming the hair on the sides, never ever ever the hair on the top.
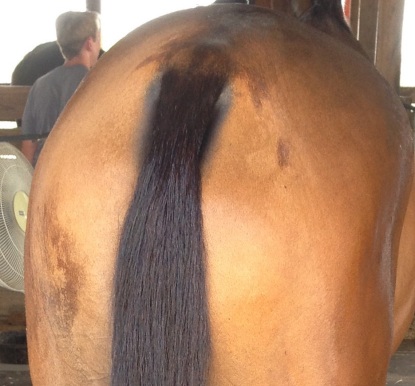
With that done, it’s time to dye. You could bang it first if you wanted to, but I prefer to do it afterward when the tail is totally detangled and brushed out so you get a tidier cut.
Which hair dye to use has a lot to do with personal preference. My favorite is Clairol, either in Natural Darkest Brown or Natural Soft Black. If you get a very dark, blue-black color it will look a bit TOO dark and unnatural. Some people prefer to use dye specifically formulated for ethnic hair, but I’ve never had a problem with the Clairol taking and holding well, and it’s easy to find, so I’ve just stuck with it.
When you’re dying a tail, make sure that you’re either wearing black or something you don’t mind getting dye all over. Maybe other people out there are neater than I, but it’s inevitable that I get some on myself somewhere. Usually several somewheres. Also – fly spray your horse first. The last thing you want when you’re trying to dye a tail is to have them trying to fling it around all over the place.
Before I get started I put a nice generous coating of conditioner (Vaseline or something similar would work too, but I just use some of the conditioner that comes in the dye kit) on the sides of the rump near where the tail sits and above the dock. You don’t want any dye seeping onto the hair on the rump and making dark spots. If your horse has white on it’s hind legs and you don’t trust yourself to be tidy with the dye (I wouldn’t), put a layer of conditioner on those too.
This is what I call The Point of No Return. Once you start putting dye on the tail you can’t let go of it until it’s bagged. So before you start, make sure your hair is tied back out of your face and make sure you have all of your supplies handy. Put on the gloves included with the dye kit, follow the instructions for mixing, and apply the dye to the tail. I typically start at the top and work my way down so that I have more control over the tail as it gets coated (you DO NOT want the horse getting its tail loose from your grasp and whacking you in the face or itself in the body with a tail that is covered in dye!). This is a pretty simple process, just do your best to get full coverage. You can always go back later and touch it up.
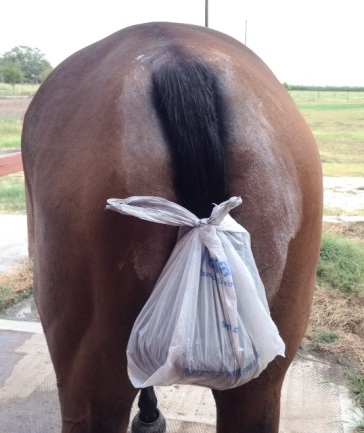
When you’re finished applying the dye, it’s time to wrap up the tail. Before you start any of this, make sure your horse is okay with a plastic bag on it’s butt. None of mine have ever minded, but ya know… I’d feel bad if one of y’all died while dying. Take the bottom part of the tail and shove it into the plastic bag, tying a secure double knot at the top around the tail bone.
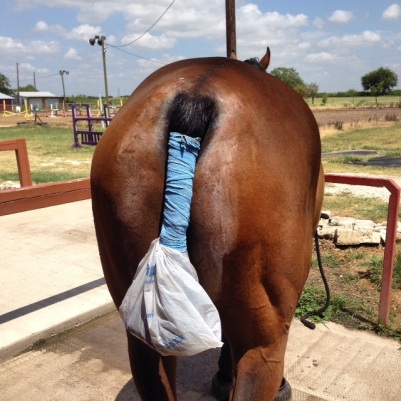
Some just leave it like this while the dye sets but I like for it to be extra secure, so I also take a roll of vet wrap and wrap over the knotted part of the bag, then all the way up the tail. That helps keep everything in place even if the horse starts swishing.
Let the dye set for however long it says in the instructions. I personally tend to err on the side of too long as opposed to not long enough. Usually that ends up being the perfect amount of time to pull/trim the mane, clip the fetlocks and bridlepath, and give Instagram a quick perusal.
After it has set, take all the wrappings out and rinse the tail until the water runs clear. Some people like to shampoo at this stage – I do not. I usually don’t shampoo for at least a few days after, but I’m not sure that it actually matters, it’s just how I do things. I rinse the tail and apply a good liberal coating of the conditioner that came in the dye kit, using the opportunity to work out all the knots and tangles with my fingers. Then I give it another good rinse, double check for any missed spots, and let it dry. Keep whatever left over dye you have and you can use it over the next couple days if you need to touch up anything… sometimes it’s hard to see missed spots until it’s all dry.
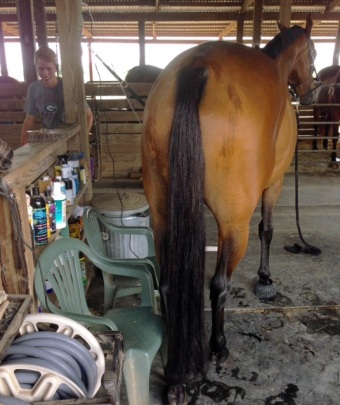
Once it’s dry it’s time to bang. Make sure everything is totally brushed out first, and then figure out how short you want to go. Typically if you have a horse that is built a little downhill (like mine) or tends to travel a bit on the forehand (like mine), you want to keep it a touch longer. A longer tail helps balance out a slightly front-heavy horse… or so they say. I’ll go with it. You also want to consider how high your horse’s natural tail carriage is.
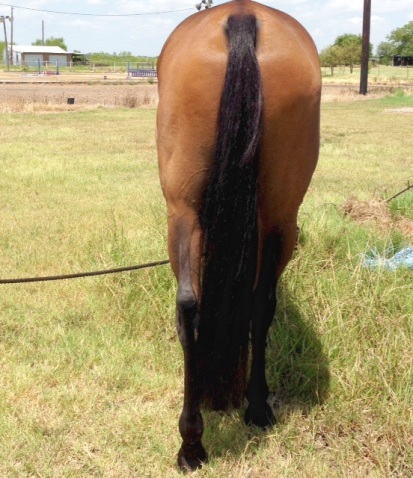
My particular horse is pretty busy with his tail and tends to carry it a little bit “up”, so if I banged his tail at mid-cannon it would look very short when he was in motion. With all of that in mind, I banged his just above the fetlock, so that when he’s in motion it falls about mid-cannon. The finished product looks like this:
As I said in the beginning, this is just my particular process that I’ve developed over the years after a lot of trial and error. Feel free to experiment and use/do whatever works best for you, but hopefully this helps get you started!

Never considered the Vaseline barrier. I’ve never died a tail though 😳
LikeLike
I’ve never dyed a tail, but with any luck we might do some shows next spring/summer and he’ll definitely need his tail dyed. As far as the trimming, he will probably never be an eventer, but it’s definitely a good thing to know. Thanks for the tutorial with lots of pictures. 🙂
LikeLike
This makes me want to dye Courage’s tail just to say I did.
LikeLike
“I’d feel bad if one of y’all died while dying.” You SLAY me!
Also, the cosmetologist’s daughter in me wants to compliment you on your decision to start at the base when dying, as the older bits of hair are more porous and will absorb the color quicker. ❤
LikeLike
It’s mostly because I don’t want to have to wrangle a whole tail covered in dye while i’m trying to dye the top, but we’ll totally go with what you said. Also I enjoyed writing bang several times.
LikeLike
Um, the first photo was of the back of my head, so who is stalking who? P.S. Will you do Halo’s, I am more of a learn from watching person!! 😉
LikeLike
You buy the dye and I’ll do it
LikeLike
Also, don’t dye a tail in your show breeches. Ask me how I know.
LikeLike
Oooof, yeah no Bueno.
LikeLike
I’ve never dyed a tail, though if I dyed Robin’s, I would die. Girlfriend has an extreme fear of plastic bags. She’s 13 and still not over it despite my desensitizing since 2003. 😉 Luckily she’s chestnut, so sun bleaching isn’t an issue.
LikeLike
Looks great! Thanks for the tutorial
LikeLike
it turned out really well! i’d love to give my mare a more manicured look for her mane and tail (tho no dye necessary, she’s already got some pretty awesome color happening au naturale)…. but i’m pretty sure her owner would vehemently and possibly violently object…. le sigh.
LikeLike
Love that tail transformation!
LikeLike
This makes me want to dye Eli’s tail! (I think he would kill me right before he dropped dead of a stroke over a plastic bag near his butt.)
LikeLike
if you’re super dedicated I supposed you could just wrap it all up in vet wrap and stay nearby.
LikeLike
I am not super dedicated. I was kinda thinking maybe a cloth bag would be less bothersome, but the dye might soak through.
LikeLike
Probably not enough to matter
LikeLike
Your process gets an A++. I love it. You make an ass look good. Well, or something to that effect.
LikeLiked by 1 person
New follower and first time commenting. I am in the endurance world where we don’t tend to care much about these things, so I found this very interesting. I understand the keeping it nice and tidy for showing bit, but why dye it? Do you really get marked down if your horse has a sun bleached tail? Is it so that the tail isn’t distracting? I’m not judging, just honestly curious as I have never heard of this before.
LikeLike
There’s really only one reason to dye anything – so it looks better. A uniformly dark tail looks fuller and more tidy, both of which are more flattering for the horse and more attractive in the show ring. You certainly don’t have to, and a lot of people don’t, but it’s a small easy harmless thing that can make a big impact on overall presentation.
LikeLike
Cool!
But why the douche bag feel with tutorials haha?
LikeLike
I dyed Lex’s tail once. I’ve considered dyeing Mo’s tail, but I’d have to leave the top because he has a lot of white hair at the top of his dock and that has to stay. ❤ Also if you don't wanna use a plastic bag, those long gloves used for palpating mares work VERY well and aren't so rattly.
LikeLike
Oh man, when I got to the part about horses being okay with a bag on their tail I suddenly had this vision of a trampled Nicole, covered in black tail-slap marks, with Murray running wildly around the property with self-applied black stripes along his body. Yeah, no tail dying for a little while for me, I think.
LikeLike